-
Memory Management (II) - Test Result
該來揭曉謎底了,在人氣不怎麼高的地方拋這些冷門的問題,看的我都覺的 “這版主真是不自量力” .. 咳咳.. 為了把之前的心得,在現在的主流作業系統及平台再驗證一次,只好自己花了點小工夫,把 C 挖出來寫個測試程式,不過 C / C++ 實在太久沒寫了,已經忘到連語法都得翻 HELP 的程度 :~ 花了些時間才搞定。
不過也因為這樣,連帶的查了一下如何編譯 x64 的程式碼,還有一些相關的設定項目。這次測試只測了 windows 的環境,沒辦法,這把年紀實在沒力氣再去摸第二種 OS 了,如果有善心人事要幫我測的話,我倒是很樂意把你測的結果一起放上來! 程式碼請看 [註3]
不多說廢話,測試主要會針對三種環境來測試:
- 一般的 x86 (win32)
- 在 x64 下的 32 位元執行環境 (wow64)
- 原生的 x64 程式
原本還想加上 /3GB options 來測的,不過這樣跟 (2) 幾乎是一樣的,只差在 3GB 跟 4GB 的可用空間而以,差異不大,當然就省下來了 [H]
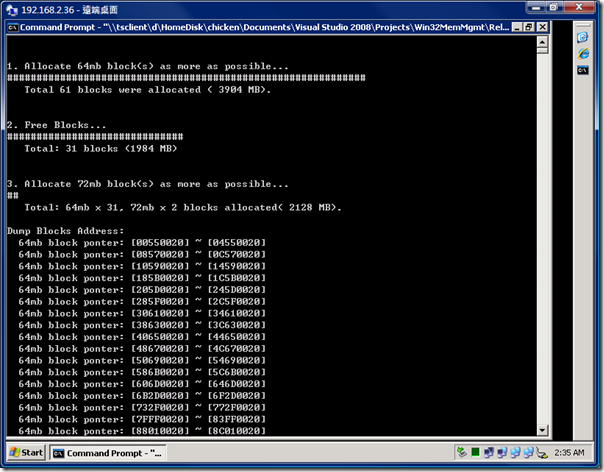
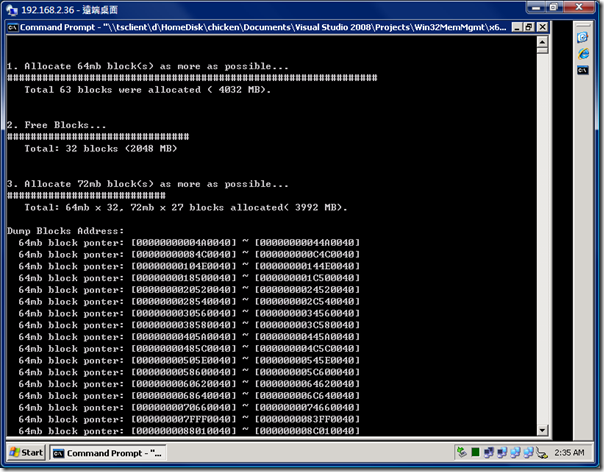
測試結果就直接抓畫面附在底下了。程式碼當然都是同一份。原始 project 放在 [這裡]。其實這次問題的關鍵,跟 windows / linux,32/64,都沒有直接關係,唯一有關的是,你的 memory address space 到底有沒有用完… 怎麼說? 先來看結果:
- x86 build (run under windows 2003 standard x64):

- x86 build + /LARGEADDRESSAWARE option (under 2003 x64)

- x64 build

看不出個所以然? 簡單畫個表格整理一下測試結果:
測試環境統一為 Windows 2003 x64 版本,可用記憶體為 2GB,分頁檔有 4GB。
測試項目 測試 #01 測試 #02 測試 #03 執行環境 32Bits (WOW64) 32Bits (WOW64) 64Bits (Native) Build Options x86 x86 + LargeAddressAware x64 可定址空間 / 實際可用空間 2048MB / 1920MB 4096MB / 3904MB 8TB / 4032MB 問題的測試結果 / 可以配置的 72mb 區塊 NO / 2 NO / 2 YES / 27 這結果大概會跌破一堆人的眼鏡,雖然板上回應的很冷清,不過私下 MSN 問了幾個人,有很肯定的,也有不確定的,當然也有亂猜猜的很肯定的 (S*M,就是你…),不過答案都很兩極,不是都不行,不然就是都可以…
就理論上來說,分頁的記憶體管理方式,的確是不能解決在 virtual memory address space 過度分散 (fragment) 的問題,如果程式或作業系統沒有作適度的 defrag,那麼你要挖一塊記憶體的要求一定會失敗,但是為什麼測試 #03 會通過? 因為實際可用的 Memory ( Physical RAM + Swap File ) 也不過 6GB,你的程式需索無度,要求超過的怎麼樣也生不出來。6GB 扣掉其它 OS / AP 用掉的,跟理論上能用的 8TB 實在是差太多,造成你的 virtual memory address space 跟本不可能用完。當然 不可能 這字眼別用太滿,十年前也是認為 4GB 跟本不可能用完,不過我現在的 PC 就已經裝了 6GB … [:$] 上表中列了一些較特別的參數,像是明明是 32 位元,怎麼可定址空間是 2048MB ? 還有 LargeAddressAware 是什麼? 這些屬 windows 較特別的規矩,我在文章最後面的 [註1] 說明一下。
現在的 PC,隨便都是 1GB / 2GB RAM,加上分頁檔,超過 4GB 跟本是件很普通的事,意思是寫不好的程式,的確是已經會面臨到這樣的困境了,明明記憶體還夠用,但是系統卻回報 Out Of Memory …。只可惜這樣的問題,OS一點忙都幫不上。因為 OS 沒有辦法替你做 Memory Defragment 的動作 [註2]。上一篇 我有畫張記憶體配置的圖,只能用來說明 #01 / #02 的情況,換成 #03 就不大適用了。只要可定址空間夠大,基本上你只需要考慮你配置的記憶體總量有沒有超過可用的記憶體就好,是不大需要在意是不是有 fragment 的問題,除非你的可配置空間跟可用空間很接近,這問題才會浮現出來。就像積木買來,積木的體積跟盒子差不多大,你要全擺進去就得花點工夫安排一下,否則一定會有一些是收不進去的一樣 (幫吳小皮收玩具的感想… -_-)。不過如果你換一個大盒子,或是把整個房間當成大盒子來看,隨便丟都沒問題,連會不會撞在一起都不用耽心,一定不會有空間夠卻放不進去的問題,這就是差別。
這測試結果看起來很可怕,感覺起來只要是 32 位元的程式,加上是 server or services,會長時間運作的,好像都有可能碰到這種問題。這不算是 Memory Leak (因為記憶體是真的有成功的被釋放),那麼 Java / .NET 宣稱的 Garbage Collection 回收機制到底會不會碰到這個問題? 別耽心,等著看下一篇就知道了 XD
–
註 1. /LARGEADDRESSAWARE:
32 位元系統可定址空間應該是 2^32 = 4GB 沒錯,不過 Microsoft 把它一分為二,規劃一半是給 Kernal,另一半才是給 APP 使用。意思是你的程式再怎麼用只能用到 2GB。不過這種問題幾年前就浮現出來了,Microsoft 特地在 OS 上加了 /3GB 這種參數,可以把 OS : AP = 2GB : 2GB 的規劃,調整為 1GB : 3GB。不過相對的程式在編譯時也要加上 /LARGEADDRESSAWARE 參數,才有可能讓 AP 取得 2GB 以上的記憶體。
所以即使在 x64 下執行的 x86 應用程式,跟本沒有 OS 那 2GB 的需求,一般 x86 APP 在 64 位元作業系統下仍然只能用到 2GB,但是不同參數編譯出來的程式碼,就能用到 4GB (如果是在加上 /3GB 的 x86 OS,則大約是 3GB)
註 2. 為什麼 OS 不能替 Memory 執行 Defragment 的動作?
原因很簡單,測試的程式是用 C / C++ 這類可以直接存取 pointer 的程式語言寫的。試想一下 OS 如果替你把已配置的記憶體區塊挪一挪會發生什麼事? 你拿到的 pointer 全都成了廢物,因為它指向的記憶體,可能已經不是當時你認識的資料了… 因為資料有可能被強迫搬家,你的通訊錄再也沒有用,老朋友就失聯了…
因此,別的程式語言不一定,但是允許你直接使用 pointer 的語言,這類的問題你閃不掉,一定得自己想辦法…
註 3. 測試程式碼
這段 code 我做了點改變,因為 4kb block size 實在太小了 (相對於 4GB 上限),印出訊息一大堆,執行又慢,因此我自己把問題的參數調整一下,把問題的 4kb 改成 64mb,而最後要配置的 5kb 則改成 72mb。若對這段 code 有興趣的人,可以直接 copy 去用。我直接把 source code 貼在底下 ( C++ 語法忘了一大半 :P,因此用的都是單純的 C … 除了 conio.h 之外,應該隨便都能成功編譯吧,看誰有興趣可以拿到 Linux 下去試看看….):
#include <stdio.h> #include <stdlib.h> #include <conio.h> #include <malloc.h> void init_buffer(void *ptr, unsigned int size) { if (ptr == NULL) return; //for (int count = 0; count < size / sizeof(long); count++) { // ((long *)ptr)[count] = 0; //} } int main(const int& args) { void *buffer1[4096]; void *buffer2[4096]; void *buffer3[4096]; // // allocate // printf("\n\n"); printf("1. Allocate 64mb block(s) as more as possible...\n"); int total = 0; for (int count = 0; count < 4096; count++) { buffer1[count] = buffer2[count] = NULL; buffer1[count] = malloc(64 * 1024 * 1024); if (buffer1[count] == NULL) break; init_buffer(buffer1[count], 64 * 1024 * 1024); printf("#"); total++; buffer2[count] = malloc(64 * 1024 * 1024); if (buffer2[count] == NULL) break; init_buffer(buffer2[count], 64 * 1024 * 1024); printf("#"); total++; } printf("\n Total %d blocks were allocated ( %d MB).\n", total, total * 64); // // free // printf("\n\n"); printf("2. Free Blocks...\n"); for (int count = 0; count < 4096; count++) { if (buffer2[count] == NULL) break; free(buffer2[count]); buffer2[count] = NULL; total--; printf("#"); } printf("\n Total: %d blocks (%d MB)\n", total, total * 64); // // allocate // printf("\n\n"); printf("3. Allocate 72mb block(s) as more as possible...\n"); int total2 = 0; for (int count = 0; count < 4096; count++) { buffer3[count] = malloc(72 * 1024 * 1024); if (buffer3[count] == NULL) break; printf("#"); total2++; } printf("\n Total: 64mb x %d, 72mb x %d blocks allocated( %d MB).\n", total, total2, total * 64 + total2 * 72); printf("\nDump Blocks Address:\n"); for (int count = 0; count < 4096; count++) { if (buffer1[count] == NULL) break; printf(" 64mb block ponter: [%08p] ~ [%08p] \n", buffer1[count], (long)buffer1[count] + 64 * 1024 * 1024); } for (int count = 0; count < 4096; count++) { if (buffer3[count] == NULL) break; printf(" 72mb block ponter: [%08p] ~ [%08p] \n", buffer3[count], (long)buffer3[count] + 72 * 1024 * 1024); } _getch(); return 0; } -
Memory Management - (I). Fragment ?
程式越寫, 越覺的課本教的東西很重要… 最近碰到一些記憶體管理的問題, 想到以前學 C 跟 OS 時, 大家都有個理想..
只要 OS 支援虛擬記憶體, 以後寫 code 都不用耽心 Memory 不夠…
聽起來很合理, 虛擬記憶體本來就是讓開發人員省事的機制啊… 當然前提不超過硬體限制, 像是 32 位元的程式就不能超過 4GB. Virtual Memory 也帶來很多好處. 除了可以以硬碟空間換取記憶體空間之外, 因為 swap 需要的 paging 機制, 也間接的解決了 “PHYSICAL” Memory Fragment 的問題.
怎麼說? 邏輯的記憶體位址, 對應到實體的記憶體位址, 不一定是連續的. 有點像是硬碟的一個大檔案, 實際上可能是散在硬碟的好幾個不連續區塊. 除了效能問題之外, 是沒有任何不同的.
因為這堆 “便民” 的機制, 現在的程式設計師還會考慮這種問題的人, 少之又少. 有的還聽不懂你在問啥… 以前在 BBS 討論版看到一個問題, 印像很深刻, 算一算十來年了還記得… 把這問題貼一下, 主題就是 programmer 到底該不該耽心 memory fragment 的問題? 實驗的方式很有趣:
- 連續以固定 size (ex: 4KB) allocate memory, 直到沒有記憶體為止
- 開始 free memory. 不過是跳著釋放. 比如 (1) 取得的一連串記憶體, 只放奇數位子 1st, 3rd, 5th, 7th ….
- 挑戰來了, 這時應該清出一半空間了. 如果我再 allocate 5KB 的記憶體, OS 會成功清給我? 還是會失敗?
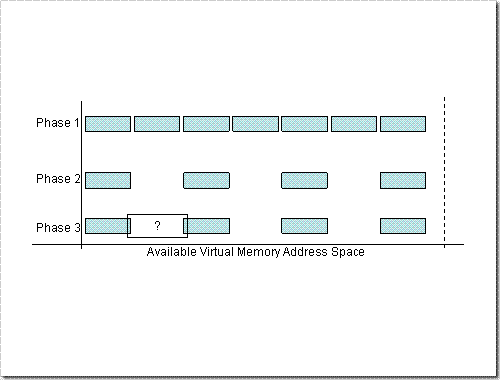
簡單畫張圖說明,就像這樣:

其中: (1) 就是在可用的定址空間內盡量塞,因為虛擬記憶體的關係,不管實體記憶體夠不夠,都能夠使用。 (2) 就是跳著釋放記憶體後的分佈情況。 (3) 圖上看來已經沒有能夠容納 “大一點” 區塊的空間了,那麼 [?] 這個區塊到底還放不放的下?
來來來, 大挑戰… 這種程式千萬別在自己家裡亂玩… 也別在你按不到 reset 開關的電腦亂玩 (ex: 遠端連到機房的 server) … 前題是用 C / C++ 這類可以直接操作 pointer 的 language. OS 不限, 覺的 Linux 強就用 Linux, 喜歡 Gates 的就用 windows… 32 / 64 位元都可以…
先賣個關子, 結果會是怎麼樣? 不同的 OS 會有不同的結果嗎? 64位元會有不同嗎? 有興趣可以試看看,懶的寫 code 也可以猜看看!
-
困難重重的 x64
即使是做足了功課,還是敗下陣來… Orz
之前 Vista x64 用的都還不錯,直到加上 4GB 之後,才是惡夢的開始… 之前貼了一篇 6GB 很爽的 POST,之前插上去只偵測到4.8GB,想說小事情,一定是 BIOS Remap沒打開的關係,果然一開就是 6GB,一切正常,就貼了 POST ..
不過隔一兩天,想開個 MCE 來看電視,怎麼沒訊號? 查了半天確定線路都正常,才想到之前剛裝好不是都 OK 嗎? MCE 還列為重點測試項目之一,driver早都打聽好了,怎麼還會這樣? 就一個一個設定 rollback 試看看…
搞半天,問題出在想都沒想到的地方… 我的 TV 卡,在Vista x64開了Memory Remap後就會出問題了。Device Manager沒有任何異狀,但是MCE就一直說訊號微弱… 跟本沒辦法看. Memory Remap 關掉就正常了。寫Mail去圓剛跟華碩的客服反應,果然再怎樣還是要買大廠的…
ASUS 有回,不過沒用…
圓剛? 沒人鳥我…
雖然切回 4.8GB 還是戡用,不過多買的 4GB 只能當 2.8GB 不到,感覺有點鳥… 加上裝了 X64 有一半以上的軟體都是 X86 … 看起來實在有點礙眼… 其實現階段用 X64 也是有些缺點的,第一就是很多軟體及 DLL 都要分兩套, x64 + x86,很佔空間。第二,一樣的程式 x64 吃的 memory 比較多,為何? 每個 Pointer 都多兩倍空間… 多少都會有影響… 第三,幾乎用到 COM 元件的都得靠 WOW,效能有點下滑… 所以暫時還是換回 x86 版了.
換回 x86 vista 後第一件事就是試試電視卡,在 x86 mode 下開不開 REMAP 就都正常,看來 Driver 要負一點責任,不過工作忙,暫時就不理它了,下次擇日再挑戰一次 x64. Ram 裝太多果然還是有一堆問題,新問題是我的主機板 (ASUS P5B-E Plus) 如果開了 BIOS Remap,進 Vista 後只能看到 2048MB Ram @_@,關掉反而還有 2.8GB… 搞什麼飛機…
又是搞了半天,確定無解,網路上很多人跟我一樣… 本想就讓它 2.8GB 吧,不過又讓我發現了個評價不錯的 Ram Disk 軟體: “Gavotte Ramdisk”
評價不外呼是免費,沒有容量限制,很穩定等等,不過它有個特異功能倒是 RAM 插太多的人要試試… 它可以把像我這樣失去的 RAM 挖回來用!!
真的蠻神奇的,只要 Vista 起用 PAE (Physical Address Extension),這套 RAM DISK 就能自動把 OS 不會抓來用的 RAM 當成 RAMDISK. 不過不開 BIOS Remap 就沒輒… 因此當場我的組態變成: RAM: 2GB, RamDisk: 4GB …
真的是 Orz,我要那麼大的 RamDisk 幹嘛? 像網路一堆人把 Page File 放到 RamDisk 上的作法又覺的有點蠢,雖然很多時後非得要 Page File 不可,不過把 RAM 不夠時某些 RAM 的資料搬到 DISK,而這 DISK 又是 RAM 模擬的,感覺就像是做了一堆白工… 算了,拔掉 2GB 吧,剩下 2GB 就當 TEMP 用,可以塞 TEMP 的就塞過去..
看起來 x64 還是小問題多多,沒那個人生跟他耗的話,還是過一陣子再試試吧,反正照這情勢,RAM很快就會漲到不得不換 X64 的地步了,往好的方面想,這應該會加速廠商移到 x64 的腳步吧? [H]
-
爽一下, 6GB RAM ...

哇哈哈, 雖然現在RAM便宜到翻掉, 不過要突破4GB的先天限制, 還真花了不少功夫… 不想用 Server 版的 OS, 也不想用 PAE 等等其它不乾不脆的方式, 走的是換 64 Bits OS 這條路, 總算成功了, 當然要貼來紀念一下.
原本有 2GB RAM, 想趁過年加個 4G 來用用… 過年期間跑了光華商場, 無奈帶了小皮問了好幾家店, 每家都說沒貨 @_@, 說是大盤過年前一周就因為盤點, 都停止出貨, 買不到 2GB DDR2 … 只好等過完年了…
回想才幾年前, 想說4GB這麼大, 對於當時的RAM容量 (4MB算很奢侈了) 跟本是天文數字, 跟本沒在想那天 RAM 超過 4GB 怎麼辦… 沒想到現在隨便就超過了… 我看未來會帶動 x64 升級的理由不是效率也不是安全性… 完全只是為了能用超過 4GB 的 RAM 吧… 反正 RAM 這麼便宜…
扯遠了, 這篇純脆是突破多年來的限制, 紀念一下而以 [H], 想敗的人快點去敗吧, 很值得的… [:D]
-
再度換裝 Vista ... Vista Ultimate (x64)
暨之前升級到 VISTA 的經驗, 到最後不適用又換回 XP 到現在, 差一個月就一年了 (真久), 這陣子因為陸陸續續解決掉一些問題, 加上一些誘因, 不得不換到 VISTA, 於是又再度換了一次…
這次會想換, 主要有幾個原因:
- 因為硬碟滿了, 過年前買了顆 750G 的新硬碟, 可以有辦法裝新 OS 而不影響到舊系統
- 想加 RAM, 不過原本已經是 2GB 了, 32 位元的系統 (XP) 再加上去效益不大, 想直接換到 64 位元, 個人用我也不大想換 server 版的 OS, 不大好用. 可用的 memory 雖然能突破 4GB, 但是它終究是 32 位元的系統, 對於記憶體的使用仍有一堆限制, 換成 x64 才是正途.
- 原本用的是 XP MCE2005, 如果要保有 MCE 的功能, 又要64位元, 那只剩 Vista x64
- Canon Raw Codec 已推出, 常用的轉檔作業都已經用 .NET Framework 3.0 改寫完成, 加上先前在 VM 試過, 可以初步解決 Canon Raw Codec 不支援 x64 的問題. 過去的障礙已經排除
- 想開始研究一下 IIS7, Win2008 還太遙遠, 直接用現成的 vista 比較快
- 家裡大人已經用 vista 好一段時間了, 看她用也沒啥問題…
- 內建的東西夠多, 我是只要內建的堪用就會用的人… 內建 DVD codec, 基本的 Video DVD 編輯程式對我還蠻有用的
- 雖然 Vista 沒啥重要的大改進, 但是每個小地方的改良加起來也不少
- Tablet PC 功能. 前陣子弄了塊陽春的數位板, 可以直接用現成的 for Tablet PC 軟體. 又是跟 MCE 一樣的例子, 過去是有特定版本的 XP, 沒辦法同時保有 Tablet PC / Media Center / x64 等好處, 只有換 Vista 一途…
- 雖然 Vista 預先載入你常用 AP 的功能常被罵到臭頭, 但是我倒是不介意多餘的 RAM 先拿去當 Cache 使用. 幾個常用的大型軟體, 在 Vista 下載入的速度還真的快很多, 雖然是錯覺, 但是至少也是有用到…
- 過去 Visual Studio 2005 在 Vista 上有些小問題 (要加裝 patch), 在 x64 下問題更多… 尤其是 debugging 時. 現在 Visual Studio 2008 出來, 這類問題都解決的差不多了
- Vista SP1 快出了, 時機應該成熟了, 預先準備一下…
- 最重要的原因: 都買了正版 Vista 了, 放著不用是怎樣… [H]
補充個事後才發現的好處, Vista Complete PC 是內建的磁碟備份工具, 類似 GHOST 那樣, 是把你整顆硬碟做成映像檔. Microsoft 當然用它推廣的格式 *.vhd, 正好跟我常用的 Virtual PC / Virtual Server 的格式一致. 多好用? 簡單在 Vista 內點兩下就可以做 Disk Image, 以後需要的話可以直接用 Vista DVD 還原, 就像 GHOST 一樣. 或是直接用 Virtual Server 2005 R2 SP1 附的工具: VHDMOUNT, 直接掛起來用 [Y]
另外一點也要特別提一下. 原本搜遍了 GOOGLE, 得到的答案清一色都是 Canon Raw Codec 不支援 Vista X64. 官方說法跟使用者討論都是這樣. 我是硬著頭皮先在 VM 裡試了一下, 耶? 至少還可以安裝上去. 不過果然不行. 我自己寫的轉檔工具不能用, 如預期的找不到對應的 Codec. 在 Windows Live Gallery 及檔案總管下也不能直接看到 .CR2 的縮圖…
不過想到過去跟 X64 + WOW (是 Windows On Windows, 不是魔獸世界) 奮戰的經驗, 其實 Microsoft 做的 32 位元回朔相容作的還不錯. 只是有一個大前題: 32 / 64 兩種 CODE 不能混在一起執行. 同一個處理程序 (Process) 內必需都是 32 或是 64 位元的 code. 第一個碰到這種問題的就是各式軟應體的 driver. 硬體的就不說了, 軟體的像一堆 “虛擬” 裝置, virtual cdrom, virtual disk, virtual network adapter … 等等. 第二個碰到的就是各式的 DLL, 它本來就是讓你載入到你的 Process 內使用的, 像一堆 ODBC driver, COM 元件, ActiveX Control, Video Codec, 加上 WPF 使用的 Image Codec, 都在此列. 這種才是真正的問題, 就像 Microsoft 可以把 IE 重新用 64 位元改寫, 但是它無法替所有的 ActiveX Control 改寫為 64 位元, 因此未來的五年內, 光是 IE 這東西, 你大概還是甩不掉 32 位元版本…
這類相容問題通常都是整套用 32 位元版本就可以解決, 就像 IE 你只要開啟 32 位元版本的話, 即使你是在 x64 OS, 也不會有太大問題. 32 位元的程式在 64 位元 OS 下執行, 還附帶了一些額外的好處. 記憶體管理就佔了不少便宜. 光是記憶體各種管理的動作就快很多 (以前看過相關文章, 不過找不到了 [:P], 下次寫 code 來測看看), 加上 32 位元的基本限制: 4GB memory size, 因為 OS 已經是 64 位元了, 4GB 可用的定址空間不用再切 2GB 給 OS 使用… 因此你的程式可用的定址空間也從 2GB 擴張到 4GB, 不無小補.
想到這些案例, 我就試了一下… 我自己寫的歸檔工具不能跑, 如果我把它切到 32 位元模式呢? 改了改 compile option, target platform 從原本的 “Any CPU” 改為 “x86”, 耶! 可以了耶… 程式能正確的抓到 Canon Codec, 並且正確的解碼跟抓到 metadata.
再試一下 Windows Live Gallery, Microsoft 還算有良心, 裝好後就有兩種 32/64 版本. 我開了 32 位元版, .CR2 的照片也都可以正確顯示.. 哇哈哈… 讚 [Y]
不過 Windows Live Gallery 有些地方要注意, 它似忽載入後會留著, 類似古早的 OLE server 一樣的技術, 跑起來後就會留在系統內, 待下次有人要執行時繼續使用. 因此如果沒有在 BOOT 後第一次就開正確的版本, 以後就有可能你開 32 位元版, 它還是跑 64 位元的給你看…
這個問題可以解決, 算是讓我願意換 Vista x64 最主要的原因, 不然我大概會傻傻的等到 Canon 好心的推出 64 位元版的 codec 才換吧 [H], 這次升級 Vista 應該不會再像上次一樣, 用一用就換回去了… 想換 x64 的人就不用再撐了, 上吧!!!
