
有時候,無知就是福啊… 沒想到我也默默忍受了這個地雷一年多了都沒發現。Container 透過 volume 掛載儲存空間到容器內部,會有一定的效能折損是一定的。然而 container 本身透過 AUFS 也有一定的效能折損啊。原本很天真的想: 我都在本機使用,想想應該不會差到哪裡去,直到膝蓋中了一箭…
事情要回顧到兩年前,我開始把 Blog 搬到 GitHub Pages 上面來開始說起… 當時為了避開 Ruby for Windows 地獄,我一直用 Docker for Windows 跑 Jekyll 在我自己 PC build website 測試,直到前一陣子突然想用 LCOW 來替代,才意外發現 volume 跟 container 內部的 I/O 效能有天跟地的差別…
不過,不論你對測試的數據有沒有興趣,請務必看一下 結論 這個章節。雖然 (先雷一下結果好了) 透過 LCOW 掛上 volume 的 I/O 效能不好看,但是別急著否定他。搞清楚它的定位,搞清楚什麼應用場景才是適合 LCOW 發揮的領域,善用他才是正途。
LAB1, 測試不同環境下 jekyll 建置時間
我決定改掉過去都會講一堆故事的習慣了,這次直接從結果開始看。我測試的標的,就用我自己的部落格,用 Jekyll 官方的 docker image:2.4.0。測試的紀錄跟數據有點囉嗦,我列在這段的最後面,有興趣的讀者們再去看就好。我直接先來解讀 LAB1 的測試結果。

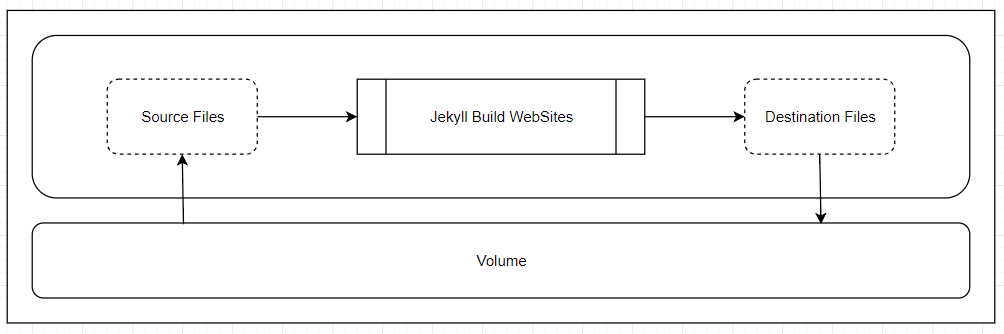
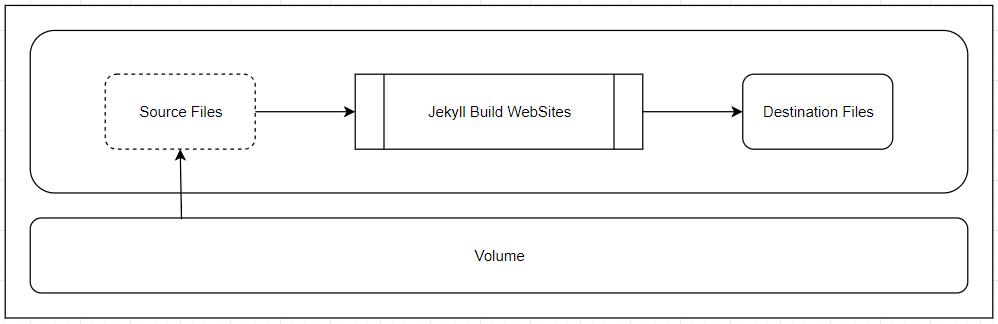
測試的方式很簡單,用 Jekyll 官方版本 docker image, 將網站的 source code 編譯成 destination web sites, 輸出成靜態檔案 (如下圖)。執行的環境分別用 docker for windows 與 LCOW (linux container on windows) 兩種,並且把 source 與 destination 分別放在 volume 與 container 內部不同的組合來進行測試。
我測試了這三種組態:
-
source 擺在 volume, destination 擺在 volume (volume -> volume)
-
source 擺在 volume, destination 擺在 container (volume -> container)
-
source 擺在 container, destination 擺在 container (container -> container)

這樣安排的目的,就是先前踩了一堆雷之後,我想觀察不同的 container engine 對於不同的 storage 處理方式,對 Jekyll build website 的效能差異到底有多大?
測試結果我列成這張表:
| volume -> volume | volume -> container | container -> container | |
|---|---|---|---|
| LCOW | (#1), 無法測試 | (#2),135.493s | (#3),12.86s |
| Docker | (#4),120.368s | (#5),35.763s | (#6),12.11s |
看起來,大量檔案的處理這種 case, 是否透過 volume 進行,對於效能有極大的影響。這跟我之前認知的 mount volume 有很大的差別啊,不過不論是 LCOW 或是 Docker for Windows, 中間都是隔著一層 Hyper-V 在進行的,理論上效能本來就會有明顯的落差 (Docker for Windows 是本機開啟 SMB share, 讓 Linux VM mount 使用)。看來在跨越 Host 與 VM 之間的 volume, LCOW 跟 Docker for Windows 的處理方式存在著落差,但是在 container -> container 的測試條件下的表現,兩者是不分軒輊的,都是最佳的表現 (大約 12 sec)。
其中比較特別的,是測試環境 #1, LCOW (volume -> volume) 這個測試。同一個 docker image, 理論上執行環境應該都是一樣的才對,但是在 LCOW 上面卻跑到一半就有錯誤訊息,試了不下數十次,每次都停在不同的檔案無法寫入的問題上。同時 volume -> container 的這組測試,兩種 container engine 表現出來的效能差異也頗大,令我訝異。看來兩種 engine 對於跨越 windows host -> linux host 之間的 volume 處理方式差異很大,不但對效能有影響,而且看來也對大量 I/O 下的某些行為 (我猜是 file lock release 時機之類的差異?) 也有不同,導致這些落差。
不過這些落差,影響我每次改完 code 要等多久才能預覽結果啊! 12 sec 我可以接受,135 sec 這種就完全不行啊! 可是 LCOW 對我而言方便一些,因為我主要都是用 windows container 居多,能用 LCOW 的話我就不用一直切換了,我可以同時使用 windows 跟 linux 的 container。
因此,我決定繼續挖下去。我大概還沒什麼本事挖出真正的原因,不過我至少可以透過實驗,更精準的掌握差異點吧? 所以我就繼續進行了 LAB2, 直接用 disk benchmark 的工具下手,試著比較一下不同的執行環境,對於 container I/O 效能的差距。
LAB2, 不同組態下 container 的 I/O 效率
前面 LAB1 是用實際的 scenario (Jekyll Build WebSite) 來當作評估的方式,但是如果單純想了解 I/O 上面的差異,比較好的方式是直接針對 I/O 進行測試。LAB2 就是要側這個東西,我找了 linux 內建的 dd 指令,也找了對應的 windows 版本 dd.exe 來當對照組,直接測試從 /dev/urandom 讀取 1M 的資料 1024 次,並寫入 container or volume 所要花費的時間。Microsoft 提供了好幾種方式來運行 windows / linux container, 我總共用了這幾種組態:
- windows host (不透過 container, 直接在本機上測試, 當參考值使用)
- linux host (不透過 container, 直接在本機上測試, 當參考值使用)
- windows container (isolation: process)
- windows container (isolation: hyper-v)
- linux container (isolation: hyper-v)
- linux container (docker for windows, hyper-v)
補充閱讀
Microsoft 在 windows container 的架構設計上,支援了 --isolation 的選項,期望提供不同層級的隔離方式, 解決 container 被詬病的安全問題。你可以選擇用預設的 process 隔離層級,可以得到最棒的效能;你也可以選擇 hyperv 的隔離層級,windows 會為你的 container 啟動專屬的 VM, 用最高的隔離層級來確保安全性。這種模式下,是在專屬 VM 跑最精簡版的 OS (nanoserver / linuxkit) 後再來啟動你指定的 container。但是在 windows 10 只支援半套,你只能用 hyper-v 隔離層級的 container, 因此這實驗一定得在支援 hyper-v 的 windows server 上面才能測試。
不過 windows 10 又另外支援 docker 已第三方角度開發的 docker for window, 裡面真的透過 hyper-v 運行了一個 MobyLinux 的 VM, 然後把 linux container 丟進去跑。這種模式大概就是方便而已,官方沒有直接支援 windows server … 當然你硬要跑也是可以,不過我想沒有人會在 production environment 這樣玩吧!
我列了 Docker for Windows 跟 LCOW 不同的幾個地方:
- Microsoft 用的底層 OS 是 LinuxKit, Docker for Windows 用的是 MobyLinux
- LCOW 會替每一個 linux container 準備獨立的 VM, Docker for Windows 會為所有的 linux container 共用同一個 VM
- LCOW 可以跟 windows container 共存,共用同樣的 network,也可存在同一組 docker compose 內。Docker for Windows 則是單純的開了個專跑 linux container 的 VM 而已,不支援 windows container。
Docker for Windows 畢竟是在 LCOW 成熟之前就有的產物,大部分的人 (包括我) 以前都需要自己在 VM 上安裝 Linux 來跑 docker, docker for windows 只是把這些動作都簡化了而已,不過本質上是同樣的東西。這畢竟不是 Microsoft 官方的產品,Microsoft 應該也不會拿掉他,但是 Microsoft 一定會持續強化自己的 LCOW … 讓你越來越不需要再透過第三方的 Docker for Windows 就能做一樣的事情。
不過因為多了 Docker for Windows 的這個變數,除了 windows server 1803 之外,我又得多測試一種環境 windows 10 1803 了…
第三個則是財力問題,不是技術問題… 哈哈哈… 理論上我要是能準備多台硬體規格相同的 server, 或是我願意重灌 OS 來測試,上面的問題就不是問題了。不過我很懶啊… 於是把腦筋動到 Azure 上了。BUT !!! Azure 上面都是 VM, VM 還要再開啟 hyper-v … 就有很多限制了,比如 VM 一定得用 D 系列,再來就是 VM 裡面在跑 hyper-v, 真的只是為了實驗或是相容性而已,實驗的結果證明這樣跑完全沒有經濟效益….
測試方式
由於硬體環境上的限制,沒辦法湊到所有環境都能用一樣的硬體來進行。因此我用一樣的 container, 一樣的測試工具, 一樣的參數來進行測試;測試結果我分成三組,每一組內的測試環境規格都是一模一樣的,因此同一組的數據可以讓你比較效能差異,不同組之間的比較的只能當作參考。
測試方式很簡單,我找了 linux 內建的指令: dd, 同時也找到對應的 dd for windows 版本,拿來當跨平台評估使用。我用這樣的指令來測試:
dd if=/dev/urandom of=./largefile bs=1M count=1024
簡單說明一下這行指令在幹嘛:
if: input file, 指定/dev/unrandom讀取亂數的內容當作 sourceof: output file, 從 if 讀出的資料,會寫到 of 指定的目的地bs: block size, 讀取與寫入過程中用的 block sizecount: 重複執行次數
白話的說,這段指令會從 if 讀取 bs 大小的資料,寫到 of, 重複 count 次,上面的參數總共會對 of 寫入 1GB 的資料, 下列所有實驗數據都是計算執行花費的時間。接下來,就是在各種環境下,分別啟動 windows container 與 linux container,記錄下執行上述測試的時間 5 次取平均值。
platform: 執行測試工具的 OS。可能的值有 windows | linux
isolation: 執行測試工具 OS 的隔離層級 (none 代表在本機上執行)。可能的值有: none | process | hyperv
of=container: 寫入 container 內的空間。
of=volume: 寫入由 host local disk 掛載進 container 使用的 volume
這次測試的硬體有三組,分別是:
- 我的桌機 (Lenovo ThinkCentre M93P Tiny, Intel i7-4785T, 16GB RAM, Intel s3520 480GB SSD)
- 我的桌機 (白牌自組, Intel i7-2600K, 24GB RAM, Intel 730 SSD, 240GB)
- Azure DS4 v3 VM (4 vcores, 16GB RAM, 30GB SSD)
LAB2-1, Windows Server 1803 (實體PC)
硬體規格 (實體 PC, Lenovo ThinkCentre M93P Tiny):
CPU: Intel i7-2600K RAM: DDR3 24GB HDD: Intel 730 SSD / 240GB OS: Microsoft Windows Server 1803
測試結果:
| platform | isolation | to container | to volume |
|---|---|---|---|
| windows | none | – | 1.5673 |
| windows | process | 1.5724 | 1.6365 |
| windows | hyperv | 5.9010 | 2.2083 |
| linux | hyperv | 4.8470 | 21.3261 |
LAB2-2, Windows 10 1803 (實體PC)
硬體規格 (實體 PC, 白牌自組):
CPU: Intel i7-4785T RAM: DDR3 16GB HDD: Intel S3520 SSD / 480GB OS: Microsoft Windows 10 Pro 1803
測試結果:
| platform | isolation | to container | to volume |
|---|---|---|---|
| windows | none | – | 3.11617 |
| windows | hyperv | 4.5774 | 5.6002 |
| linux | hyperv(LCOW) | 6.3755 | 41.1397 |
| linux | hyperv | 6.2241 | 9.1047 |
LAB2-3, Azure D4S VM
硬體規格:
Azure D4S v3 (參考規格說明), 在 VM 內執行 systeminfo 的結果,請參考附錄。
CPU: 4 vcore RAM: 16GB HDD: 30GB Managed Disk, Preminum SSD, ENCRYPTION not enabled
測試結果:
| platform | isolation | to container | to volume |
|---|---|---|---|
| windows | none | – | 2.1890 |
| windows | process | 2.0567 | 2.1264 |
| windows | hyperv | 66.8226 | 3.3977 |
| linux | hyperv | 52.5351 | 59.9209 |
| linux | none | – | 6.3952 |
| linux | process | 6.5074 | 6.5207 |
測試結果解讀
這個 LAB 2 結果還蠻有趣的,好幾個不同的解讀方向…
如果是標準的 container 運作方式 (也就是只虛擬化 OS),只有 process 的隔離層級來看,windows container 表現其實不差啊!
我拿 LAB2-3 的兩個結果來看 (我暫且不拿不同的 OS 來比較,從工具 DD 跟 device: /dev/urandom 的設計都有差別):
- windows 原生環境的測試,跑完要 2.19 sec, 容器內執行寫入 container / volume 分別要 2.06 sec / 2.13 sec, 差異不大,可視為沒有太大的影響。
- linux 原生環境的測試,跑完要 6.40 sec, 容器內執行寫入 container / volume 分別要 6.51 sec / 6.52 sec, 差異一樣不大。
不過,要是 I/O 的測試,跨越了 OS 的邊界,isolation level 從 process 提升到 hyper-v, 結果就完全不同了。我先把比較的範圍,限定在 windows container, 比較 process / hyperv / hyperv (LCOW) 三種測試方式。
以 LAB2-1 最接近正常使用狀況的環境 (windows server), 得到的數據是:
| platform | isolation | to container | to volume |
|---|---|---|---|
| windows | none | – | 1.5673 |
| windows | process | 1.5724 | 1.6365 |
| windows | hyperv | 5.9010 | 2.2083 |
| linux | hyperv | 4.8470 | 21.3261 |
看起來 hyper-v 的隔離層級,反而對於 container 本身的 I/O 有較大的影響。windows 從 1.57 sec 增加到 5.90 sec (376%)。換成 linuxkit, 效果好一點,不過也增加到 4.85 sec (309%)。不過如果是寫到掛進來的 volume, windows container 的最佳化就好的多。完成測試花費的時間只從原本的 1.64 sec 增加到 2.21 sec (135%), 但是 linuxkit 的 LCOW, 應該還沒有特別針對這部分優化,filesystem 的效能暴跌到 21.33 sec 才能完成測試 (1301%)
LAB2-2 改用 windows 10 pro, 除了 OS 本身限制無法執行 process 的隔離層級測試之外,測試結果也差不多。不過 windows 10 pro 多了 docker for windows 可以用,算是第三方直接 create hyper-v VM, 來當作 remote linux docker engine 來使用。從使用 docker for windows 的 linux container 經驗,要掛上 volume 必須透過 local network 走 SMB (docker for windows 會替我建立 C: D: 的 share), 反而效能沒有掉的那麼誇張。LCOW 寫入 volume 跑出 41.14 sec 這爛成績,但是 docker for windows 的 linux container 卻 “只要” 9.10 sec …
眼見為憑,來看看 LAB2-2 的數據:
| platform | isolation | to container | to volume |
|---|---|---|---|
| windows | none | – | 3.11617 |
| windows | hyperv | 4.5774 | 5.6002 |
| linux | hyperv(LCOW) | 6.3755 | 41.1397 |
| linux | hyperv | 6.2241 | 9.1047 |
至於 LAB2-3 測完後真的覺得是來亂的。Azure 也好,AWS 也好,大家都知道他提供的是 VM … 本身就已經做過虛擬化,而且 DISK 通常也不是一般 server 用的 local disk, 某種程度都是 storage server …, 加上我們的測試,需要在 VM 上面再虛擬化建立 VM … 這些測試你還不能隨便玩,按照 Azure 的官方說明,你至少要選擇 DS4 系列以上的 VM 才支援 nested virtualization 的能力。不過那個效能已經離譜到沒有參考價值了,我想應該也沒人會在 production environment 這樣搞吧? 在 Azure 上,要混用不同 OS 的 container, 最佳做法應該是透過 orchestration (docker swarm or k8s) 把你的 container 只派到適當的 node 執行才對,讓每種 container 都能用 process 的隔離層級執行才是上策。
結論
數據上面的評論,上面都講了。這邊我就寫一下我測完之後的感想吧!
容器化的技術,就是想要在接近原生的效能前提上,提供我們類似 VM 般的封裝機制,再搭配良好的建置工具與映像檔管理的機制,讓我們能更方便的使用。Linux 環境其實很單純,就那麼一種選擇而已,沒啥好談的,但是 Windows Container 的定位到是很值得聊一聊。
在我看來,windows container 仍然是大有可為的。尤其是對 developer …, 因為:
- windows container 提供了 .NET (framework) developer 也能享用到 container 好處的唯一機會。
- windows container 提供了要混用 windows / linux 環境的開發人員,一個最佳的整合環境。
其實講到這裡,不免又要自推一下我以前的文章: .NET 開發人員該如何看待 Open Source Solutions?, Microsoft 自己很清楚,在 cloud / server 端的世界,windows server 是居於弱勢的平台。Microsoft 在 Azure 也不再處處以 windows / .NET 優先了。那麼 windows server 的定位會是? 很明顯的企業市場仍然是主要能發揮的地方,另一個主戰場就是牢牢地抓住 developer 了。這策略可以從這幾點得到證明:
- visual studio 是世界上最好的 IDE, 沒有之一
- microsoft 積極地打入 developer 的社群,貢獻 open source projects (甚至還把 github 買下來 XD)
- microsoft 積極的改善跨平台的開發工具 (visual studio, xmarian, visual studio code)
- microsoft 積極的改善 windows 成為跨平台的開發環境 (WSL windows subsystem for linux, )
- microsoft 積極的向 container 靠攏 (windows container, LCOW)
Microsoft 放棄了手機的 OS (windows phone), 在 Cloud 端的 OS (windows server) 也處於劣勢,Developer 這塊空間就是 Microsoft 的主戰場了。不得不說這部分做得還不錯。講了這麼多,我在這篇只有一個結論是: LCOW (Linux Container On Windows) 最適合的應用對象就是開發人員。當你需要快速搭建混合 windows / linux 的測試環境,windows server 是你的好選擇。由於 container 的架構,有絕佳的相容性,配合 docker 的 eco system, 你可以很容易的把你的 application 遷移到正規的環境上面,用最有效率的方式執行。然而開發測試,就用最方便的架構來進行。
從這個角度來看,上面的測試 LCOW 的效能表現,反而不是最關鍵的考量了 (不過那個爆爛的 I/O 效能應該還是要改一改吧)! 我寫這篇的目的是希望大家都能正確的了解效能上的差異,與定位上的差異,你才能做出最適當的選擇。不然,一定會有人看到數字就開槍,然後就引發信仰大戰…認清每個產品的特性,做出最佳的選擇才是最重要的,不是嗎?
附錄: LAB1 實驗結果
測試網站: 安德魯的部落格
- repo: https://github.com/andrew0928/columns.chicken-house.net
- repo 大小: 549mb, 4778 files
- source 大小: 278mb, 3604 files
- 文章大小: 308 篇 (.md 跟 .html), 共 3.12mb
測試環境 #1: LCOW (volume -> volume)
- Image: Jekyll 2.4.0
- Source: volume
- Destnation: volume
- Build Time: 68.52 sec (測試中斷) (碼表)
Logs:
ruby 2.5.1p57 (2018-03-29 revision 63029) [x86_64-linux-musl]
Configuration file: /srv/jekyll/_config.yml
Configuration file: /srv/jekyll/_config.yml
            Source: /srv/jekyll
       Destination: /srv/jekyll/_site
 Incremental build: enabled
      Generating...
jekyll 3.4.3 | Error:  Operation not permitted @ apply2files - /srv/jekyll/_site/assets/js/jquery-ui.js
每次中斷的時間跟位置都有點不同,我做了幾次實驗,看來是隨機的:
jekyll 3.4.3 | Error:  Operation not permitted @ apply2files - /srv/jekyll/_site/assets/js/jquery.toc.js
jekyll 3.4.3 | Error:  Operation not permitted @ apply2files - /srv/jekyll/_site/assets/js/jquery-ui.js
jekyll 3.4.3 | Error:  Operation not permitted @ apply2files - /srv/jekyll/_site/assets/images/qrcode.jpg
jekyll 3.4.3 | Error:  Operation not permitted @ apply2files - /srv/jekyll/_site/assets/images/octocat-spinner-32-EAF2F5.gif
jekyll 3.4.3 | Error:  Operation not permitted @ apply2files - /srv/jekyll/_site/assets/images/octocat-spinner-16px.gif
...
測試環境 #2: LCOW (volume -> container)
- Image: Jekyll 2.4.0
- Source: volume
- Destnation: container
- Build Time: 135.493 sec
Logs:
ruby 2.5.1p57 (2018-03-29 revision 63029) [x86_64-linux-musl]
Configuration file: /srv/jekyll/_config.yml
Configuration file: /srv/jekyll/_config.yml
       Deprecation: You appear to have pagination turned on, but you haven't included the `jekyll-paginate` gem. Ensure you have `gems: [jekyll-paginate]` in your configuration file.
            Source: /srv/jekyll
       Destination: /tmp
 Incremental build: enabled
      Generating...
                    done in 135.493 seconds.
 Auto-regeneration: enabled for '/srv/jekyll'
Configuration file: /srv/jekyll/_config.yml
    Server address: http://0.0.0.0:4000/
  Server running... press ctrl-c to stop.
測試環境 #3: LCOW (container -> container)
- Image: Jekyll 2.4.0
- Source: container
- Destnation: container
- Build Time: 12.86 sec (碼表)
Logs:
/srv # jekyll s --watch --drafts --source /tmp/source --destination /tmp/site --unpublished
Configuration file: /tmp/source/_config.yml
            Source: /tmp/source
       Destination: /tmp/site
      Generating...
                    done.
 Auto-regeneration: enabled for '/tmp/source'
Configuration file: /tmp/source/_config.yml
    Server address: http://0.0.0.0:4000
  Server running... press ctrl-c to stop.
測試環境 #4: Docker for Windows
- Image: Jekyll 2.4.0
- Source: volume
- Destnation: volume
- Build Time: 120.368 sec
Logs:
Configuration file: /srv/jekyll/_config.yml
Configuration file: /srv/jekyll/_config.yml
            Source: /srv/jekyll
       Destination: /srv/jekyll/_site
 Incremental build: enabled
      Generating...
                    done in 120.368 seconds.
 Auto-regeneration: enabled for '/srv/jekyll'
Configuration file: /srv/jekyll/_config.yml
    Server address: http://0.0.0.0:4000/
  Server running... press ctrl-c to stop.
測試環境 #5: Docker for Windows
- Image: Jekyll 2.4.0
- Source: volume
- Destnation: container
- Build Time: 35.763 sec
Logs:
Configuration file: /srv/jekyll/_config.yml
Configuration file: /srv/jekyll/_config.yml
            Source: /srv/jekyll
       Destination: /tmp
 Incremental build: enabled
      Generating...
                    done in 35.763 seconds.
 Auto-regeneration: enabled for '/srv/jekyll'
Configuration file: /srv/jekyll/_config.yml
    Server address: http://0.0.0.0:4000/
  Server running... press ctrl-c to stop.
測試環境 #6: Docker for Windows
- Image: Jekyll 2.4.0
- Source: container
- Destnation: container
- Build Time: 12.11 sec (碼表)
Logs:
/srv/jekyll # jekyll serve --watch -s /tmp/src -d /tmp/dst
Configuration file: /tmp/src/_config.yml
            Source: /tmp/src
       Destination: /tmp/dst
      Generating...
                    done.
 Auto-regeneration: enabled for '/tmp/src'
Configuration file: /tmp/src/_config.yml
    Server address: http://0.0.0.0:4000
  Server running... press ctrl-c to stop.
附錄 2, Azure DS4 V3 的 SystemInfo 結果
C:\Users\andrew>systeminfo

Host Name:                 wcs8
OS Name:                   Microsoft Windows Server Datacenter
OS Version:                10.0.17134 N/A Build 17134
OS Manufacturer:           Microsoft Corporation
OS Configuration:          Standalone Server
OS Build Type:             Multiprocessor Free
Registered Owner:          N/A
Registered Organization:   N/A
Product ID:                00395-60000-00001-AA623
Original Install Date:     7/25/2018, 5:02:31 PM
System Boot Time:          8/11/2018, 1:08:34 PM
System Manufacturer:       Microsoft Corporation
System Model:              Virtual Machine
System Type:               x64-based PC
Processor(s):              1 Processor(s) Installed.
                           [01]: Intel64 Family 6 Model 63 Stepping 2 GenuineIntel ~2394 Mhz
BIOS Version:              American Megatrends Inc. 090007 , 6/2/2017
Windows Directory:         C:\Windows
System Directory:          C:\Windows\system32
Boot Device:               \Device\HarddiskVolume1
System Locale:             en-us;English (United States)
Input Locale:              en-us;English (United States)
Time Zone:                 (UTC) Coordinated Universal Time
Total Physical Memory:     16,384 MB
Available Physical Memory: 14,994 MB
Virtual Memory: Max Size:  19,328 MB
Virtual Memory: Available: 17,906 MB
Virtual Memory: In Use:    1,422 MB
Page File Location(s):     D:\pagefile.sys
Domain:                    WORKGROUP
Logon Server:              \\wcs8
Hotfix(s):                 1 Hotfix(s) Installed.
                           [01]: KB4284835
Network Card(s):           3 NIC(s) Installed.
                           [01]: Microsoft Hyper-V Network Adapter
                                 Connection Name: Ethernet 2
                                 DHCP Enabled:    Yes
                                 DHCP Server:     168.63.129.16
                                 IP address(es)
                                 [01]: 10.0.3.5
                                 [02]: fe80::4d6a:2bca:6875:5312
                           [02]: Hyper-V Virtual Ethernet Adapter
                                 Connection Name: vEthernet (nat)
                                 DHCP Enabled:    Yes
                                 DHCP Server:     255.255.255.255
                                 IP address(es)
                                 [01]: 172.27.224.1
                                 [02]: fe80::7d6f:41d2:32a6:462a
                           [03]: Mellanox ConnectX-3 Virtual Function Ethernet Adapter
                                 Connection Name: Ethernet 4
                                 DHCP Enabled:    No
                                 IP address(es)
Hyper-V Requirements:      A hypervisor has been detected. Features required for Hyper-V will not be displayed.